The cost of sending a Samsung emoji

A few months ago, my Galaxy S4 Mini (click this link to go to my series about it) updated to Android KitKat – from Jelly Bean. KitKat was released in 2013, but because Samsung like to fiddle with Android before they roll it out to users – or as I now like to say, apply their Disney layer – kudos to David – it takes a while for their handsets to get the updates.

Apart from a few minor interface changes – some good and some not so good – I didn’t really notice much of a difference with the KitKat upgrade. Some of my icons changed colour, my screen mirroring functionality seemed to stop working and GPS got renamed Location. There were a few other changes but at this moment they escape me.

Oh and how could I forget, that annoying emoji/emoticon button! KitKat added a terribly annoying button to my keyboard, a smiling face, which whenever you accidentally click on it, becomes the default extras button; that’s the lovely little button next to the space key that gives you the option of voice typing, pasting, visiting settings, and now also adding an emoji.

Samsung emoji keyboard

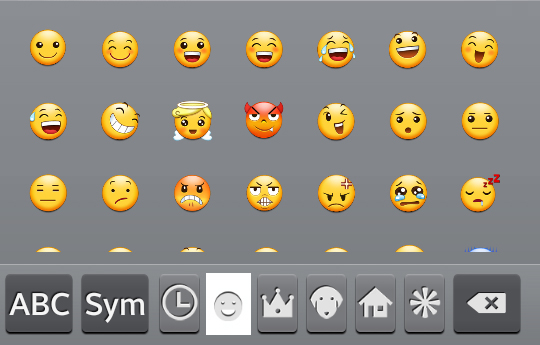
The emoji on my Samsung Galaxy S4 Mini keyboard

Now I’m not against emoji, some of them are pretty cool… 🙂

…what I am against is Samsung emoji. The super-duper Samsung upgrade to KitKat may have enabled me to send emoji – yay! – but it came at a cost: MMS. If I want to send an emoji, Samsung very kindly converts my text message (an SMS) into an MMS.

This isn’t a problem if you get a large number of MMS messages included in your contract, but most people (at least here in the UK) don’t. I’m not someone who does either, so when I tried to send a message (no bigger than one standard text message) with an emoji in it, I got charged 33 pence by my provider and worst of all the recipient was unable to receive MMS messages, so they didn’t even get to see my 33p text!

The BBC and Money Saving Expert are just two sites that have recently been warning consumers of the hidden costs linked to emoji usage.

Cue Textra.

Textra SMS

iPhone owners don’t suffer the same fate as I did, because Apple’s default messaging application doesn’t treat emotion icons as images. They may take up more than one character, but you can use them in SMS messages. Not wanting to be outdone, I went on the hunt for a better SMS app.

First I tried Google Hangouts. I have never got along very well with Hangouts, but when I started using it for text messages, I didn’t find it quite so bad. I could send emoji as text messages, and I could type as many characters I liked and it would just send multiple SMS messages; Samsung’s default messaging app converts messages larger than three texts into MMS messages too.

After a week or so, Hangouts’ lack of features and general design started to get on my nerves, so I was out on the hunt again for another alternative. After reviewing a handful of very viable alternatives, I decided to give Textra SMS a try.

Textra SMS quick reply

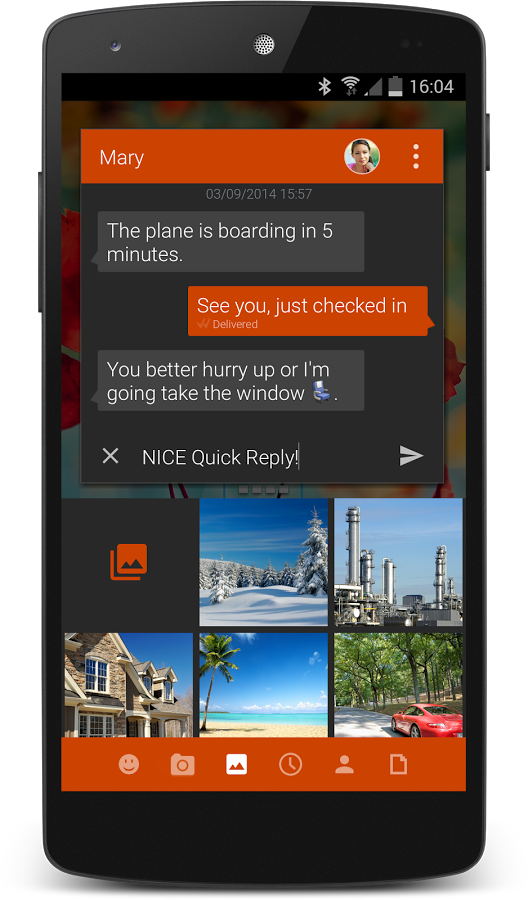
When you get a new text, Textra SMS enables you to reply quickly, without opening the full app.

To put it simple, Textra is fantastic. You can do pretty much everything you can with Samsung’s standard messaging app, and more. You can customise the look and feel, you can send as may characters as you like without it converting into an MMS, and you can send emoji!

One of the awesome features that got me hooked on Textra is the message preview. Say you are browsing the web and you get a text. Texra has the option of a notification which appears at the top of your screen; the notification is basically a message preview. If you ignore it, it disappears after a few seconds, but if you click on it and it opens a small version of the app over the top of whatever you were doing previously. You can type a reply and then as soon as you click send, it disappears and you are back to what you were doing.

If you are looking for an alternative texting app for Android, I would definitely recommend Textra.

Monitive – 1 year on

Last year the founder of Monitive.com, Lucian Daniliuc, contacted me, asking if we wanted to run a competition to giveaway 10 Monitive licenses; I accepted and we launched our first ever competition.

I was also given a Monitive account, and have been using it for a year now. In this post I am going to review my experience of the service after a years use.

Latency

One of the main things I use Monitive for is to monitor site response times. Latency is very important, and can have a huge effect on traffic, as the longer people have to wait, the more people you loose before the page loads.

With superfast broadband, many of us are becoming incredibly impatient, and if something isn’t responding, we might ditch a site in a matter of milliseconds.

Before using Monitive, I had no idea how long Technology Bloggers took to respond. Monitive allows me to see on a daily basis how long the blog takes to respond, in multiple locations, all around the world. I know that if you live in Liechtenstein or Ireland, the blog on average seems to take around half a second (500 ms) to respond. In the UK it’s about 0.6 seconds, whereas in the USA, it takes just over a second.

This lets me ask the site’s host why the latency varies so much, and ask them what they can do to improve global response times.

Response times Technology Bloggers - April 2012 to April 2013

A chart showing the average global response times of Technology Bloggers.

Uptime

Whilst response time is important, it has no value if your site is offline. Monitive is accessing Technology Bloggers every 5 minutes from hundreds of locations around the world, to ensure that the site is live and accessible. If the blog goes offline for more than 3 minutes, I am sent an email. These are my personal settings, you can make checks/notifications more/less frequent, and can get notified via SMS and Twitter.

Quite disappointingly I report that Technology Bloggers went offline 23 times in the last 30 days. During this period, you couldn’t access the site for more than 10 minutes on 6 occasions. If I wasn’t using Monitive, I would only have spotted one or two of these outages myself. I can now report these to the site’s host, and ask why the site has gone offline so many times.

Uptime graph 2013

A chart of the uptime and downtime Technology Bloggers experienced in April/May 2013.

Unless you pay for load balancing, to mirror your site on various servers across the world, and effectively distribute traffic, to ensure 100% uptime, you should expect some downtime. It is expected that most sites will have some go down at some point, however how frequently this happens, and how long they remain offline for is something to consider.

We have a 99.9% uptime guarantee on the blog, yet this year so far, uptime has been 99.85%, meaning around five hours of downtime has occurred this year already.

Improvements

One thing I don’t like about the service is that it doesn’t allow on demand checks. I think it would be very useful to be able to check the status (including response time) of a site at a desired location, whenever you want; but as of yet, this can’t be done.

As I have set Monitive to check the blog every 5 minutes, and then notify me after 3 minutes of downtime, it can be a while before the system updates. For example, if the site is checked at 13:00 and at 13:01 I check and the site is down, it wont be checked again until 13:05, and I wont be notified until 13:08. In such a situation, being able to check the current status, could be useful.

Chadrack

One of the winners of our Monitive competition was Chadrack Irobogo. I asked him what he thought of the service.

“I can say, it was great because throughout the period I was able to know what was going on with my site. Before then, I really did not know anything about site monitoring. It was during the use of this program I learned when my blog was either down or up. And all of these was done without my doing anything. Unfortunately, I cant really give any details about the program. Only thing I can say is, it is really good.”

I agree with Chadrack on his point about the service being an eye opener to downtime. I really didn’t understand how often sites go down, even if only for very short periods of time.

Like Chadrack, Monitive is the first commercial website monitoring service I have used, so I don’t know how Monitive compares to its competitors. I am however suitable impressed by their services to want to keep using them.

If you are interested in Monitive’s services, do check out their uptime monitoring website. I have found website monitoring very useful, and am thankful to Monitive for my license, and for giving us prizes for our competition last year.

Setting up and testing my heating schedule

This is the 150th article I have posted on Technology Bloggers!

This is the fourth in a series of articles in which I am exploring Remote Heating Control – a technology of the future. Learn more about this series by reading the introductory article, called stepping into the future of smarter living.

In the last few weeks it has been getting colder, and around a week ago, I decided that it was time to put my heating on. I would usually try to hold off until October, however this year, as I now have Remote Heating Control installed, I didn’t think about it in the same way. Why set a date before which you will not turn on your heating? If it is cold in September but warm in October, why not have your heating on in September and off in October?

With Remote Heating Control I can tell my heating to come on only when the temperature in my house drops below a certain level. I know it may sound odd, but I can have my heating scheduled to come on in July if the temperature drops below say 15°C. Is that likely? Probably not, however if it were to happen, I would be able to justify putting my heating on, as it isn’t the time of year that should govern my heating habits, I believe it should be the temperature.

Setting Up A Heating Scheduled

I was now ready to become one of the first people in the country to programme a heating scheduled via the internet!

To set a schedule is really simple. I login to myHome, and on the homepage click the heating box – remember from last time, there are two boxes on the home screen, temperature and heating. This takes you to the schedule screen where you can set your heating schedule.

The schedule is split into four sections, Sleep, Wake, Away and Home. Sleep covers late at night until early morning, Wake covers early morning, Away covers the day, and Home is the evening. These times are obviously just guidelines, and you can use them for whatever you want, but I imagine most people will use Sleep for when they are in bed, Wake for when they get up in the morning, Away for when they go out, be it for leisure, work, school or whatever, and Home for when they return.

That schedule plan worked for me, so I set mine. For the moment, as it isn’t that cold, I decided that at the time of day I want my house the hottest I would have it at 18°C – I don’t mind wearing a jumper, but I don’t want to freeze! That is in the evening and morning, when I wake up and return home. During the day I am out, so I don’t mind the house getting colder so I have set this to 8°C – no point heating empty rooms! Then at night, I want to be comfortable if I get up, however I should be in bed for most of it, so I have set the temperature to 15°C. It will keep the house from going cold but wont waste unnecessary gas.

The image below shows my heating schedule.

Remote Heating Control Simple Schedule - Simple View

My heating schedule

The image above shows the temperatures at which my heating will be triggered. You may notice that there is one schedule for weekdays, and another for the weekend. This is because of a weekend, you are likely to do different things than on a weekday, so you may want your heating different. If your days are all pretty much the same, then setting your heating via the Simple schedule is probably the easiest way. For me however I use the Advanced schedule option (see the blue tab at the top right of the image).

Below is my heating schedule as viewed from the advanced view.

Remote Heating Control Schedule - Advanced

My heating schedule – advanced view

As you can see, throughout the week my heating has slight daily variations. I can only make these changes on the Advanced heating schedule tab. Some noticeable variations are that on Monday morning, my heating comes on a little earlier than the rest of the week. This is because I have to get up slightly earlier. On a Friday and Saturday, my Home period lasts slightly longer, keeping my house warm later into the night, this is because I will usually stay up later on these days. Also on a weekend I am usually in the house all day on Sunday, so during the day my heating is at 18°C.

The brilliant thing about setting a schedule is that I can still change the temperature whenever I like. Say it is Monday and I come home at midday, my heating will only be set to come on if the house temperature drops below 8°C. When I arrive home I want the temperature to be 18°C though. The change is really easy to make, I just get out my phone and text HEAT ON 18 to a number British Gas have given me, and for the duration of that heating cycle (which would be Away) my heating schedule will be overridden and my house will stay at 18°C. When the next cycle (Home) starts, the heating schedule will automatically turn back onto the default temperature for that time.

I could also change the schedule via an app. Both Android and iDevice apps are available, so you can change your heating temperature via any iDevice or Android powered phone with an internet connection.

The heating temperature can also be altered from within my house on the smart linked thermostat, but it is often much more convenient to do it remotely – it means coming home to a warm house!

Hopefully you now understand how the schedule part of British Gas’s Remote Heating Control technology works. I have been using it for around a week now, and it has been really great. I have been getting up and it has been warm, and when I come home of an evening the house is already warm.

I am sure in the weeks to come when it gets colder, I will change the schedule, to make it hotter than 18°C, however at the moment, with the weather like it is seem to be just the right temperature to be comfortable whilst not wasting too much gas.

An interesting and useful tool that the myHome system has is that is tells you the temperature your smart linked thermostat has read in the recent past month. This means you can work out when your heating will have been triggered, and when it wont have because the temperature will have been above the ‘kick in’ level.

I am able to use the temperature history graph (reached by clicking on the temperature box on the homepage) to see what sort of temperature my house has been at recently, and judge against how I have been feeling (e.g. too hot, comfortable, nippy, cold etc.) the temperature it has been, to ensure that I only have my heating come on when I really want it to.

To conclude this article (4/6 in this series) I am really glad to have been asked to be a pioneer in testing the technology, as it is proving very useful at saving my money – we will have to wait for a bill to come through to try to see just how much.

Next Time

The next article in the series will go live on Friday the 19th of October, when we will be well into mid-Autumn, and looking at a 14 day forecast the temperature outside will be around 9°C where I live, so I will surely be using the heating every day, most of the time.

In the next article I will be talking some more about the other resources that are available behind the buttons on the myHome console. I will also be updating you as always on my experience of the system.